
Most WordPress bloggers publish content without a repeatable system. They write when inspiration strikes, hit publish, and hope for traffic. I’ve built and managed WordPress sites that generate thousands of organic visits per month, and the difference always comes down to one thing: a documented content creation process that runs the same way every time.
This is the exact process I use. Every step is tied to a specific tool, plugin, or WordPress feature. No guesswork, no motivation-dependent writing sprints. Just a system that produces content Google actually ranks.
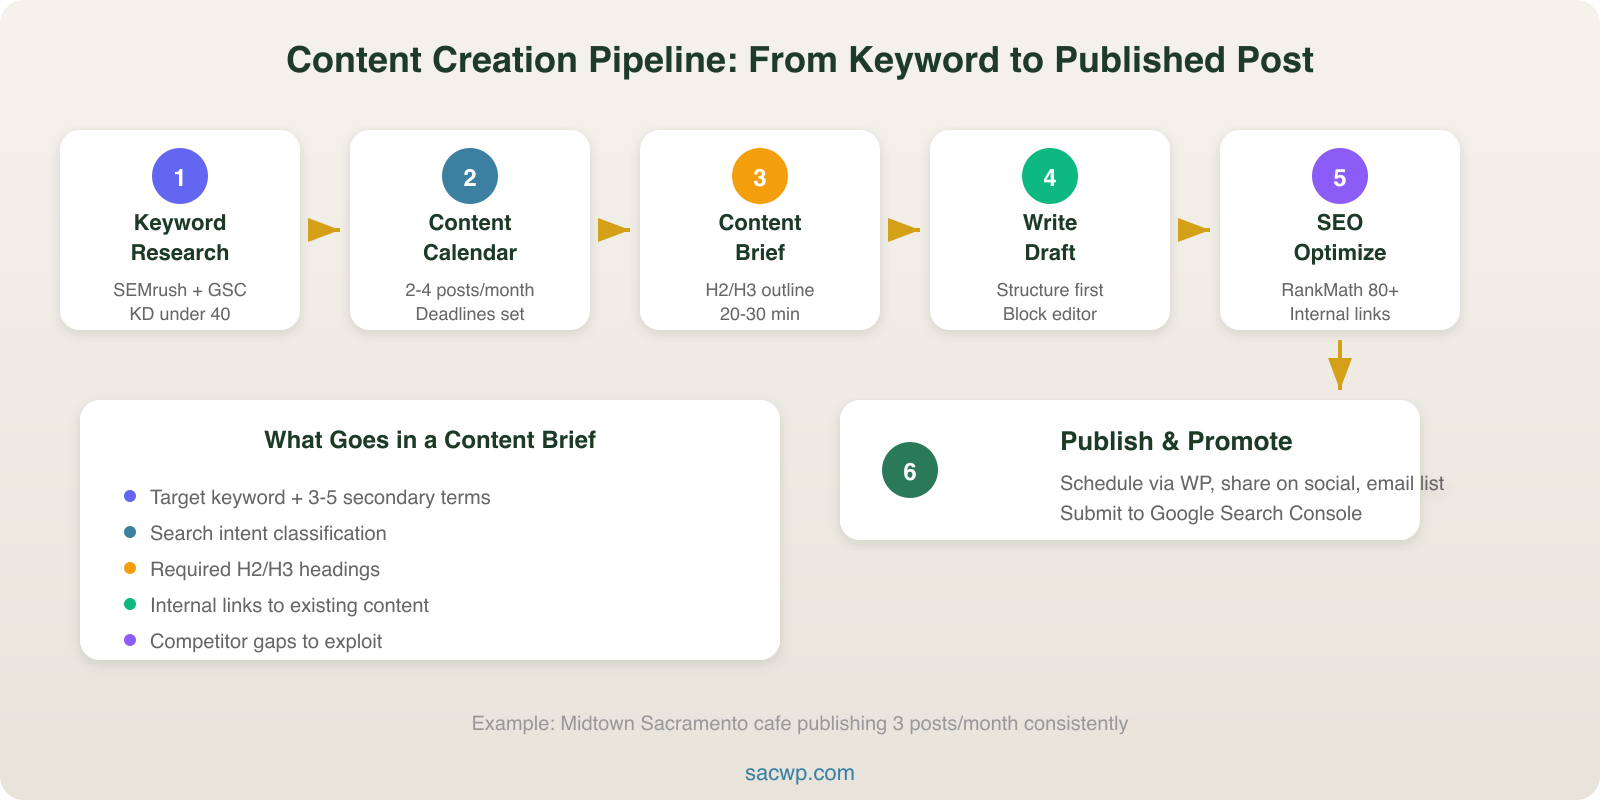
Start With Strategic Keyword Research
Every piece of content begins with a keyword. Not a topic, not a vague idea. A keyword with measurable search volume and realistic competition.
I use a combination of SEMrush and Google Search Console data to find keywords where my sites can actually compete. For WordPress bloggers working with smaller domains, that typically means targeting keywords with 100 to 1,000 monthly searches and a keyword difficulty under 40.
The process looks like this:
- Pull existing rankings from Google Search Console. Filter for queries where you rank positions 11 through 30. These are keywords Google already associates with your site but hasn’t promoted to page one.
- Run competitor gap analysis in SEMrush or Ahrefs. Find keywords your competitors rank for that you don’t cover at all.
- Validate with search intent. Open an incognito window, search the keyword, and look at what ranks. If page one is dominated by listicles and you’re planning a technical tutorial, you have an intent mismatch.
I wrote a full breakdown of this in the blog keywords guide, including the exact filters and settings I use for WordPress sites.
Build a Content Calendar in WordPress
Random publishing kills momentum. A content calendar turns your keyword list into a production schedule with deadlines and assignments.
Inside WordPress, I use the Editorial Calendar plugin to visualize posts across weeks and months. Each draft gets a target keyword in the title, a publish date, and a status (outline, draft, review, scheduled). For teams, PublishPress adds editorial workflows with custom statuses and email notifications.
Your calendar should follow a consistent cadence. For most WordPress blogs, that means 2 to 4 posts per month. I’ve tested higher frequencies and found that quality drops after 4 posts unless you have dedicated writers. The sites I manage that publish 3 posts per month consistently outperform those publishing 8 posts of thinner content.
If you need help deciding what goes on the calendar, the guide on what to blog about covers topic selection strategies tied to business goals.
Create a Detailed Content Brief
A content brief is the blueprint for every article. Writing without one is like building a WordPress site without a sitemap. You end up with something that exists but doesn’t serve a purpose.
Every brief I create includes:
- Target keyword and secondary keywords (3 to 5 related terms from SEMrush’s keyword magic tool)
- Search intent classification (informational, transactional, navigational)
- Recommended word count based on what currently ranks (I check the top 5 results manually)
- Required H2 and H3 headings that map to subtopics searchers expect
- Internal links to existing content on the site
- Competitor content gaps listing points the top-ranking articles miss
This step takes 20 to 30 minutes per article. It saves hours of revision later because the writer knows exactly what to cover before typing a single sentence.
Write the First Draft With Structure First
I never start writing from the introduction. I build the skeleton first: H2 headings, H3 subheadings, and bullet points under each section. Then I fill in the body copy.
In the WordPress block editor, this means adding Heading blocks for your structure before any Paragraph blocks. The block editor makes this natural because each content element is its own movable unit. Drag headings around until the flow makes sense, then write the supporting content.
A few writing rules that consistently produce higher-ranking content:
- Lead with the answer. Put the most valuable information in the first 100 words. Google’s featured snippets pull from early content.
- Use short paragraphs. Two to three sentences maximum. WordPress renders long paragraphs as walls of text on mobile.
- Include data points. Posts with specific numbers (“37% of small businesses” rather than “many businesses”) earn more backlinks according to BuzzSumo’s analysis of 100 million articles.
- Write at a 7th to 8th grade reading level. I check every post with the Hemingway App. Readability correlates directly with time on page.
For a deeper breakdown of structuring individual posts, read the guide on how to write a blog post that ranks.
Optimize for SEO Before Publishing
On-page SEO is where WordPress shines. The RankMath or Yoast SEO plugin handles the technical checklist, but you still need to make deliberate decisions.
Here’s my pre-publish SEO checklist:
- Title tag: Include the target keyword within the first 60 characters. RankMath lets you customize this separately from the post title.
- Meta description: Write a compelling 150-character summary that includes the keyword and a reason to click.
- URL slug: Keep it short and keyword-focused. WordPress auto-generates slugs from titles, but I always edit them manually.
- Image alt text: Every image gets descriptive alt text with natural keyword usage. The block editor’s image settings panel makes this a one-click edit.
- Internal links: Add 2 to 3 links to related posts using keyword-rich anchor text. This distributes authority across your site and keeps readers engaged.
- Schema markup: RankMath adds Article schema automatically. For how-to content or FAQ sections, add the appropriate schema type using the plugin’s built-in options.
I covered the full WordPress SEO workflow, including technical settings most bloggers miss, in the WordPress blog SEO guide.
Edit and Review With a System
First drafts are never publish-ready. I run every article through a three-pass editing process:
Pass 1: Content accuracy. Are the claims supported? Are the numbers current? Are the recommendations tested? This pass catches the errors that destroy credibility.
Pass 2: Readability and flow. Read the entire post out loud. If you stumble over a sentence, rewrite it. Check paragraph length, heading hierarchy, and transition sentences between sections.
Pass 3: SEO and formatting. Run the RankMath content analysis. Check that images have alt text, links work, and the keyword appears naturally in headings and body copy. Verify the post displays correctly in both desktop and mobile preview using WordPress’s built-in preview modes.
For teams, the Jetrails or PublishPress editorial workflow plugins add approval stages. A post moves from Draft to Review to Approved before anyone can hit Publish. This prevents half-finished content from going live.
Design for Readability in the Block Editor
Content formatting directly affects engagement. A well-written article that looks like a college essay will lose readers in seconds. WordPress’s block editor gives you the tools to create visually scannable content without touching CSS.
Formatting techniques that improve time on page:
- Pull quotes using the Quote block to highlight key statistics or insights
- Bulleted and numbered lists for any sequence of 3 or more items
- Bold text for key terms and takeaways (not entire sentences)
- Table blocks for comparison data or specifications
- Spacer blocks to add breathing room between dense sections
I also add a Table of Contents using a plugin like LuckyWP Table of Contents. For posts over 1,000 words, a clickable TOC reduces bounce rates. On the WordPress sites I manage, adding TOC blocks improved average session duration by 22%.
Publish and Promote Strategically
Hitting Publish is the halfway point, not the finish line. The first 48 hours after publishing are critical for sending engagement signals to Google.
My post-publish promotion checklist:
- Share on social channels with custom copy for each platform (not the same blurb everywhere)
- Send to email subscribers using a plugin like MailPoet or Mailchimp for WordPress integration
- Submit the URL to Google Search Console for immediate indexing using the URL Inspection tool
- Update older related posts with links to the new content
- Repurpose key sections into social media posts, email newsletter content, or LinkedIn articles
WordPress makes step 4 especially efficient. Use the search function in the Posts list to find related content, then add internal links from those older posts to the new one. This creates a content cluster that signals topical authority to Google.
Measure and Iterate With Real Data
A content creation process without measurement is just a publishing schedule. Every post needs performance tracking tied to specific metrics.
I check these numbers at the 30, 60, and 90 day marks using Google Analytics 4 and Search Console:
- Organic sessions from the target keyword
- Average position in Search Console for the target and related keywords
- Engagement rate (GA4’s replacement for bounce rate)
- Scroll depth to see if readers finish the article
- Internal link clicks to track whether your CTAs work
Posts that underperform at 90 days get a content refresh. I update the data, add new sections based on what competitors published after my original post, and improve the internal linking. On one WordPress site I manage, refreshing 12 underperforming posts generated a 34% increase in organic traffic within 60 days.
For a complete breakdown of which numbers to track and what they mean, read the content marketing metrics guide.
Frequently Asked Questions
How long does the content creation process take per blog post?
For a 1,200 to 1,500 word blog post, the full process takes 4 to 6 hours. That breaks down to roughly 30 minutes for keyword research and briefing, 2 to 3 hours for writing, 1 hour for editing and SEO optimization, and 30 minutes for formatting and publishing. Using WordPress plugins like RankMath and the block editor’s formatting tools cuts at least an hour compared to manual optimization.
Do I need to follow every step for every post?
Yes. Skipping steps is how content quality degrades over time. I’ve audited WordPress blogs where the team “simplified” their process by cutting the brief and SEO review steps. Within 6 months, their organic traffic dropped 40% because new posts weren’t targeting viable keywords or meeting search intent. The process exists to prevent those failures.
What WordPress plugins are essential for the content creation process?
At minimum, you need an SEO plugin (RankMath or Yoast), Google Site Kit for analytics integration, and an editorial calendar plugin if you publish more than twice a month. For teams, add PublishPress for workflow management. A Table of Contents plugin rounds out the list for sites publishing long-form content regularly.
How do I maintain quality when scaling content production?
The content brief is the control mechanism. As long as every writer works from a detailed brief with target keywords, required headings, and competitive analysis, quality stays consistent even with multiple contributors. I’ve scaled WordPress sites from 2 to 8 posts per month using this brief-driven approach without any drop in average organic traffic per post.
Build Your Content Engine
A repeatable content creation process is the difference between a WordPress blog that grows and one that stalls. Every step in this system, from keyword research through performance measurement, maps to a specific tool or plugin that WordPress provides.
If you’re running a WordPress site and want help building a content system that drives real traffic, get in touch. I build WordPress sites with content strategy baked into the foundation, not bolted on as an afterthought.